什么是hexo
基于Node.js的博客框架,使用Markdown解析文章
安装
安装前提
必须安装以下环境:
- Node.js
- Git
安装hexo
$ npm install -g hexo-cli全局安装
1 | hexo init <folder> |
目录结构
1 | . |
_config.yml
站点配置文件
scaffolds
模板文件夹
- page.md
- post.md
- draft.md
source
用户资源文件夹
_posts文件夹存放md文件themes
主题文件夹
写作
1 | `$ hexo new [layout] <title>` |
自动生成名为test.md的markdown文件到_post文件夹下。
或者手动复制markdown文件至_post文件夹下,但需要手动添加头部信息:
1 | --- |
更多
展示在首页,多余部分隐藏:
1 | <!--more--> |
markdown语法的
[TOC]目录,在hexo中无法展示
点击更多时,从头开始阅读:
1 | scroll_to_more: false |
发布
本地部署
生成静态页面:
1 | `$ hexo generate` |
或者简写:
1 | `$ hexo g` |
启动服务器
1 | `$ hexo server` |
或者简写:
1 | `$ hexo server` |
提示:
1 | INFO Hexo is running at http://localhost:4000/. Press Ctrl+C to stop. |
在浏览器中打开http://localhost:4000/

部署到Github Page
创建库
新建一个名为yourname.github.io的库
在setting中开启github page
配置Deployment
在_config.yml文件中,找到Deployment,然后按照如下修改,用户名改成自己的GitHub信息:
需要注意的是:冒号后面记得空一格!
1 | # Deployment |
提交
1 | // 生成新的 public 文件 |
排错
部署完毕后,
githubPage打开显示404,项目setting中的githubPage项提示:The tag fancybox on line 77 in theme/landspace/README.md is not recognized Liquid tag解决办法:
1
2
3rm -rf .deploy_git
hexo g
hexo d提示没有git仓库
解决办法:
git init其他报错
进阶
解析到个人域名
GitHub 仓库的根目录下建立一个 CNAME 的文本文件(注意:没有扩展名),文件里面只能输入一个你的域名,不能加http://
www.xxxxx.com
进入域名提供商地址,添加解析
注意:CNAME文件在下次 hexo deploy的时候就消失了,需要重新创建,这样就很繁琐
方法:通过安装插件实现永久保留
1
$ npm install hexo-generator-cname --save
之后在
_config.yml中添加一条1
2plugins:
- hexo-generator-cname
Next主题
hexo默认主题是landscape,可以更改为其他主题。
Next主题是目前较流行且成熟的主题。next主题文档
主题风格
Next提供4个主题风格,选择自己想要的。
- Muse

- Mist

- Pisces

- Gemini

更换头像
代码高亮
分类页
新建分类页面
1 | hexo new page categories |
给分类页面添加类型
在source文件夹中的categories文件夹下找到index.md文件,并在它的头部加上type属性。
1 | --- |
接下来的每篇文章中,都可以在头部添加分类信息:
1 | --- |
标签页
同样可以设置标签页
1 | hexo new page tags |
给标签页面添加类型
在source文件夹中的tags文件夹下找到index.md文件,并在它的头部加上type属性。
1 | title: tags |
接下来的每篇文章中,都可以在头部添加标签信息:
1 | --- |
修改底部建站信息
修改主题的配置文件:
1 | footer: |
隐藏hexo链接和Next链接
统计阅读次数
使用LeanCloud的服务,具体方法参考教程,添加完之后效果如下:

注册LeanCloud帐号并验证邮箱之后,新建应用。
由于存在ACL权限问题,新建时选择
无限制
左侧下划线开头的都是系统预定义好的表,新建一个表,名字必须为Counter
创建完成之后,左侧数据栏应该会多出一栏名为Counter的栏目
点击设置,选择应用Key,即可得到AppID以及AppKey
将其复制到主题配置文件:
1 | leancloud_visitors: |
记录文章访问量的唯一标识符是文章的
发布日期以及文章的标题,因此请确保这两个数值组合的唯一性,如果你更改了这两个数值,会造成文章阅读数值的清零重计。
每次访问一篇文章后,Counter表就会多出一条字段,可以修改其中的time字段来修改阅读次数。
安全问题:在
设置-安全中心-Web 安全域名中,填入自己的博客域名
字数统计与阅读时长
打开/themes/next/layout/_macro/post.swig`文件

站内搜索
安装插件
1 | npm install hexo-generator-searchdb --save |
修改 主题配置文件
1 | local_search: |
404页
推荐用腾讯公益404页面,寻找丢失儿童,关注公益事业。
使用方法,新建404.html页面,放到主题的source目录下,内容如下:
1 |
|
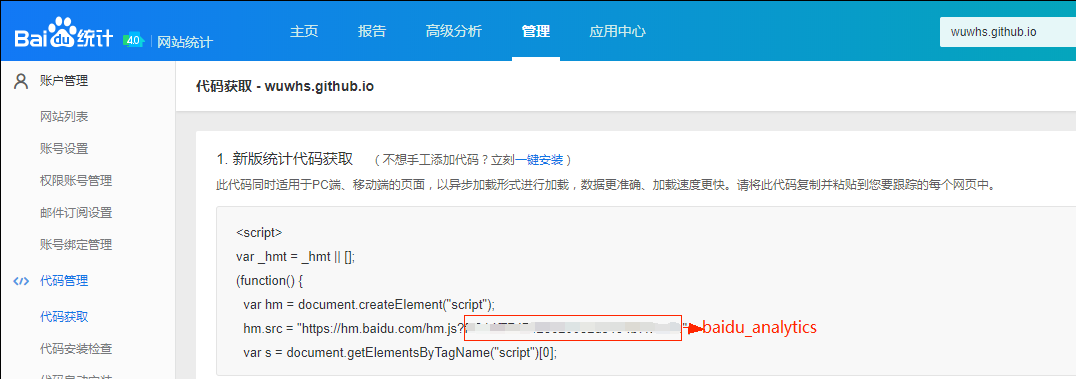
站点分析
使用百度统计,注册百度统计,管理 > 网站列表 > 新增网站完成后,代码管理 > 代码获取,就能得到统计id。
1 | # Baidu Analytics ID |
评论功能
推荐使用[gitment](https://imsun.net/posts/gitment-introduction/)
注册 OAuth Application
点击此处 来注册一个新的 OAuth Application
得到一个 client ID 和一个 client secret,将被用于之后的用户登录。
gitment配置
配置项如下
1 | # Gitment |
github授权后的用户就可以评论了
Valine
gitment不太好用,换用Valine
Valine是基于LeanCloud的评论系统,支持图片、emoji等
在LeanCloud上新建一个应用,取得其appId和appKey,修改主题配置文件:
1 | valine: |